Giới thiệu
Bài viết này là một tutorial cơ bản về Pytorch. Tôi sẽ tự tạo dữ liệu random và tạo model Linear Regression bằng Pytorch.
Trong Machine Learning (ML), có hai thư viện phổ biến để tạo mô hình (model). Pytorch trong những năm gần đây được sử dụng trong nhiều paper. Nhiều diễn đàn có nói việc tạo model bằng Pytorch rất tự nhiên và dễ debug.
Người đọc bài viết nên có kiến thức cơ bản về Machine Learning:
- Feature, label của dữ liệu là gì?
- Một model Linear Regression cơ bản hoạt động như thế nào?
- Thuật toán optimization. Trong khi train dữ liệu model học như thế nào?
Về Linear Regression có bài viết dễ hiểu bằng tiếng việt:
https://machinelearningcoban.com/2016/12/28/linearregression/
Về các đề tài trên, các bạn có thể xem playlist của giáo sư Andrew Ng ở đây:
https://www.youtube.com/watch?v=kHwlB_j7Hkc&list=PLJs7lEb1U5pYnrI0Wn4mzPmppVqwERL_4
Install và import thư viện
Đầu tiên bạn có thể cài đặt thư viện:
Bạn có thể sử dụng trực tiếp notebook này để lấy sẵn code của bài viết nếu muốn.
https://github.com/longlm-vnlab/pytorch_basics/blob/main/part_1/Linear Regression.ipynb
Trong Jupyter Notebook bạn thử import như dưới, để kiểm tra cài đặt đúng không.
import torch
from torch import nn
import matplotlib.pyplot as plt
from mpl_toolkits.mplot3d import axes3d
import numpy as np
Bài toán cơ bản trong Machine Learning
Trong bài toán ML bình thường, ta chỉ biết được dữ liệu X gồm feature và label y . Và nhiệm vụ của model phải tự tìm weight và bias chính xác, để dự đoán \( \hat{y} \) khớp với label y càng nhiều càng tốt.
Ví dụ, ta có bài toán dự đoán giá nhà là bao nhiêu. Để làm vậy, ta cần có label giá nhà trước, để model học theo ví dụ. Tương ứng với một label, ta cần có dữ liệu về nhà, gồm các feature (tính chất):
- nhà có bao nhiêu phòng
- diện tích bao nhiêu mét vuông.
- địa điểm ở đâu
...
Model như Linear Regression sẽ tìm ra các con số gọi là weights và bias. Để với weight và bias hợp lý, model chỉ lấy dữ liệu về nhà chưa được thấy trước, mà có thể đưa dự đoán giá nhà chính xác.
Tạo dữ liệu thử
Vì ta muốn kiểm tra xem code pytorch có hoạt động đúng không, ta khởi tạo trước weights và bias.
Lưu ý: đây chỉ là mục đích kiểm tra sau khi tạo model, trong thực tế ta không biết weight bias là gì
W = np.array([0.3, 1.2])
b = 0.7
Viết cách tính label y dựa vào dữ liệu X, weight W và bias b:
def get_y_noise(X):
    noise = np.random.normal(loc=0, scale=1, size=1)[0]
    y = np.matmul(X, W) + b
    result = y + noise
    return result


def get_y(X):
    y = np.matmul(X, W) + b
    return y
Tạo dữ liệu X gồm 2 feature một cách random và tạo label y dựa vào công thức trên.
Lưu ý: trong bài toán ML bình thường, ta sẽ không tự tạo dữ liệu như thế này, mà lấy dữ liệu và label từ một hệ thống có sẵn.
# Tạo 1000 dữ liệu X
X = np.random.random(size=(1000, 2))  * 10
X = X.reshape(-1, 2)
y = np.apply_along_axis(get_y, axis=1, arr=X)
y = y.reshape(-1, 1)
Kiểm tra dữ liệu X và y trông như thế nào:
def create_figure(X, y):
    fig = plt.figure(figsize=(8, 8))

    # add axes
    ax = fig.add_subplot(111,projection='3d')

    # plot the plane
    ax.scatter(X[:, 0], X[:, 1], y, marker="o")
    ax.set_xlabel('X feature 1')
    ax.set_ylabel('X feature 2')
    ax.set_zlabel('Y')

    plt.show()

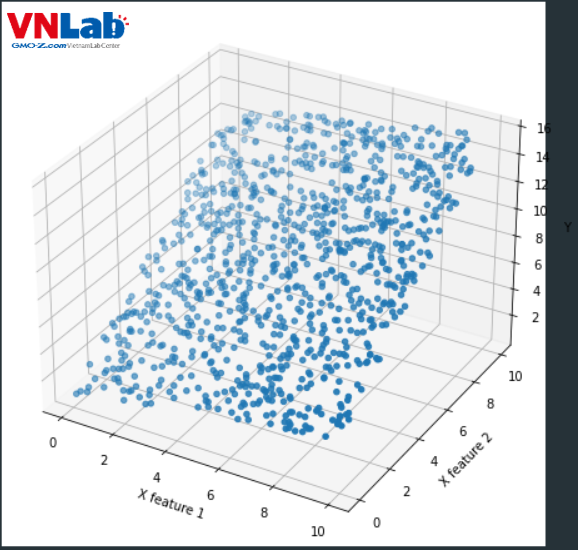
Hình 1: Biểu đồ phân tán cho dữ liệu X và label y tự tạo. Trên không gian 3 chiều, có thể thấy giá trị y tạo một mặt phẳng 2 chiều.
Tạo model Linear Regression
Code tạo model Linear Regression:
class LinearRegression(nn.Module):
    def __init__(self):
        super(LinearRegression, self).__init__()
        self.linear_fn = nn.Linear(2, 1)

    def forward(self, X):
        logits = self.linear_fn(X)
        return logits
Để tạo model riêng, ta tạo class thừa kế từ nn.Module của pytorch.
Sau đó trong __init__(), ta sử dụng nn.Linear gồm số feature đầu vào (2 feature tạo ngẫu nhiên của X), và đầu ra (dự đoán số y là gì, nên chỉ 1).
Về cơ bản nn.Linear dựa theo công thức tương tự như np.matmul(X, W) + b dùng tạo label y ở trên. Cụ thể hơn:
\( \hat{y} = Xw + b \)
Công thức 1: cách tính sử dụng trong nn.Linear
Trong đó
- \( \hat{y} \): là giá trị dự đoán
- X là ma trận gồm tất cả dữ liệu và 2 feature
- w là vector cho weight
- b là bias
Tạo function forward(X) chấp nhận dữ liệu X và gọi đến layer nn.Linear ở trên để đưa ra kết quả dự đoán \( \hat{y} \).
Khởi tạo model:
model = LinearRegression()
# lr: tốc độ  model học.
# weight decay: sử dụng regularization. Nếu không có, weight sẽ có giá trị lớn và model không học đúng (Exploding Gradient).
optimizer = torch.optim.SGD(model.parameters(), lr=0.01, weight_decay=0.01)
# Định nghĩa MSE loss
loss_fn = torch.nn.MSELoss()
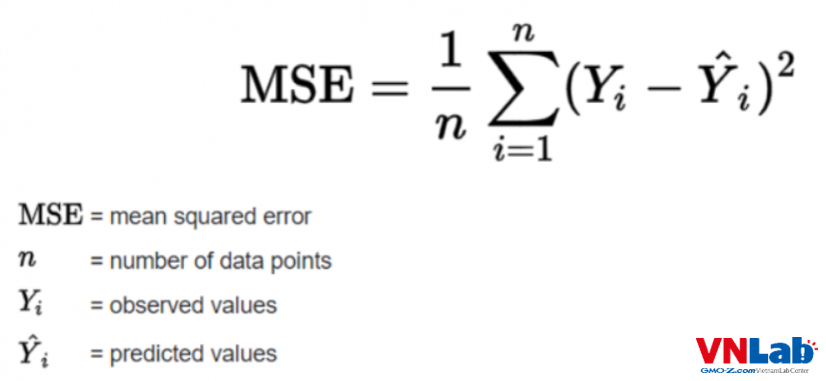
Ta dùng thuật toán Stochatic Gradient Descent(SGD) để train và optimize model. Dùng MSE để kiểm tra độ lệch giữa label dự đoán \( \hat{y} \) và label y thực tế .

Công thức 2: tính MSE loss. Nguồn ảnh: https://www.tutorialexample.com/understand-torch-nn-mseloss-compute-the-mean-squared-error-squared-l2-norm-pytorch-tutorial/
Kiểm tra weight và bias ban đầu của model:
def print_param(model):
    for name, param in model.named_parameters():
        print(f"name: {name}, param: {param}, gradients: {param.grad}")     print_param(model)
Kết quả:
name: linear_fn.weight, param: Parameter containing:
tensor([[-0.0094, -0.3944]], requires_grad=True), gradients: None
name: linear_fn.bias, param: Parameter containing:
tensor([0.6304], requires_grad=True), gradients: None
Để ý giá trị Weight và Bias của model khác với Weight và bias định nghĩa ban đầu
# Hiện tại Weight của model là [-0.0094, -0.3944]. Weight định nghĩa ban đầu là:
W = np.array([0.3, 1.2])
# Bias của model là [0.6304]. Bias định nghĩa ban đầu là:
b = 0.7
Tiếp theo ta sẽ tiến hành train model để weight và bias được tối ưu hóa và sửa để đúng với kết quả trên.
Tạo vòng lặp để train model
Các bạn có thể theo comment dưới:
# Biến dữ liêu về tensor để pytorch đọc được.
# Chỉ cần hiểu tensor là một "kiểu dữ liệu"(type) theo cách model Pytorch có thể sử dụng được.
X = torch.tensor(X, dtype=torch.float)
y = torch.tensor(y, dtype=torch.float)

# Model học 400 lần
epochs = 400

# Mỗi một vòng học một lần
# Học sử dụng tất cả dữ liệu, không chia batch
for epoch in range(1, epochs + 1):
    # Optimizer sẽ tích lũy số liệu sửa weight và bias gọi là gradient, kết quả là model không học đúng.
    # Reset lại gradient của optimizer. Nếu bỏ optimizer sẽ tích trữ gradient, model sẽ học không đúng.
    optimizer.zero_grad()

    # Cho model dự đoán thử
    predicted_y = model(X)
    # Tính độ lệch giữa dự đoán và số thật bằng MSE
    loss = loss_fn(predicted_y, y)

    # Print kết quả sau mỗi 50 lần model học
    if epoch % 50 == 0:
        print(f"Epoch:{epoch}, MSE: {loss}")
        print_param(model)

    # Tính gradient cho weight và bias dựa vào loss
    loss.backward()
    # Sửa weight và bias dựa vào gradient.
    optimizer.step()
Nếu chạy sẽ cho kết quả như dưới. Có thể thấy loss MSE đang là bao nhiêu và giá trị của weight và bias là gì.
Epoch:50, MSE: 0.13640134036540985
name: linear_fn.weight, param: Parameter containing:
tensor([[0.3833, 1.2846]], requires_grad=True), gradients: tensor([[0., 0.]])
name: linear_fn.bias, param: Parameter containing:
tensor([-0.2951], requires_grad=True), gradients: tensor([0.])
Epoch:100, MSE: 0.10351185500621796
name: linear_fn.weight, param: Parameter containing:
tensor([[0.3724, 1.2738]], requires_grad=True), gradients: tensor([[0., 0.]])
name: linear_fn.bias, param: Parameter containing:
tensor([-0.1669], requires_grad=True), gradients: tensor([0.])
Epoch:150, MSE: 0.07862469553947449
name: linear_fn.weight, param: Parameter containing:
tensor([[0.3632, 1.2643]], requires_grad=True), gradients: tensor([[0., 0.]])
name: linear_fn.bias, param: Parameter containing:
tensor([-0.0555], requires_grad=True), gradients: tensor([0.])
Epoch:200, MSE: 0.059782691299915314
name: linear_fn.weight, param: Parameter containing:
tensor([[0.3551, 1.2560]], requires_grad=True), gradients: tensor([[0., 0.]])
name: linear_fn.bias, param: Parameter containing:
tensor([0.0412], requires_grad=True), gradients: tensor([0.])
Epoch:250, MSE: 0.04550955072045326
name: linear_fn.weight, param: Parameter containing:
tensor([[0.3481, 1.2488]], requires_grad=True), gradients: tensor([[0., 0.]])
name: linear_fn.bias, param: Parameter containing:
tensor([0.1252], requires_grad=True), gradients: tensor([0.])
Epoch:300, MSE: 0.03469066321849823
name: linear_fn.weight, param: Parameter containing:
tensor([[0.3420, 1.2426]], requires_grad=True), gradients: tensor([[0., 0.]])
name: linear_fn.bias, param: Parameter containing:
tensor([0.1981], requires_grad=True), gradients: tensor([0.])
Epoch:350, MSE: 0.026484210044145584
name: linear_fn.weight, param: Parameter containing:
tensor([[0.3367, 1.2372]], requires_grad=True), gradients: tensor([[0., 0.]])
name: linear_fn.bias, param: Parameter containing:
tensor([0.2615], requires_grad=True), gradients: tensor([0.])
Epoch:400, MSE: 0.020254306495189667
name: linear_fn.weight, param: Parameter containing:
tensor([[0.3322, 1.2325]], requires_grad=True), gradients: tensor([[0., 0.]])
name: linear_fn.bias, param: Parameter containing:
tensor([0.3165], requires_grad=True), gradients: tensor([0.])
MSE đang giảm có nghĩa là độ lệch giữa dự đoán và giá trị thật đang gỉảm. Để ý weight và bias cũng đang thay đổi. Model đang học đúng.
So sánh kết quả
Kiểm tra weight và bias của model sau khi train:
print_param(model)
Kết quả:
name: linear_fn.weight, param: Parameter containing:
tensor([[0.2990, 1.1986]], requires_grad=True), gradients: tensor([[-0.0039, -0.0128]])
name: linear_fn.bias, param: Parameter containing:
tensor([0.7131], requires_grad=True), gradients: tensor([0.0025])
So sánh với weight và bias dùng để tạo dữ liệu:
# Hiện tại Weight của model là [0.2990, 1.1986]. Weight định nghĩa ban đầu là:
W = np.array([0.3, 1.2])
# Bias của model là [0.7131]. Bias định nghĩa ban đầu là:
b = 0.7
Có thể thấy weight và bias model tìm được và được định nghĩa ban đầu gần bằng nhau.
Tiếp theo, so sánh kết quả dự đoán \( \hat{y} \) và label y
def create_compare_figure(X, y, y_pred):
    fig = plt.figure(figsize=(8, 8))

    # add axes
    ax = fig.add_subplot(111,projection='3d')

    # plot the plane
    ax.scatter(X[:, 0], X[:, 1], y, marker="o", alpha=0.5, label="truth_y")
    ax.scatter(X[:, 0], X[:, 1], y_pred, marker="o", color="red", alpha=0.5, label="predicted_y")
    ax.set_xlabel('X feature 1')
    ax.set_ylabel('X feature 2')
    ax.set_zlabel('Y')
    ax.legend()

    plt.show()

# Dự đoán và chuyển từ tensor thành numpy
y_pred = model(X).detach().numpy()
create_compare_figure(X, y, y_pred)
Kết quả:

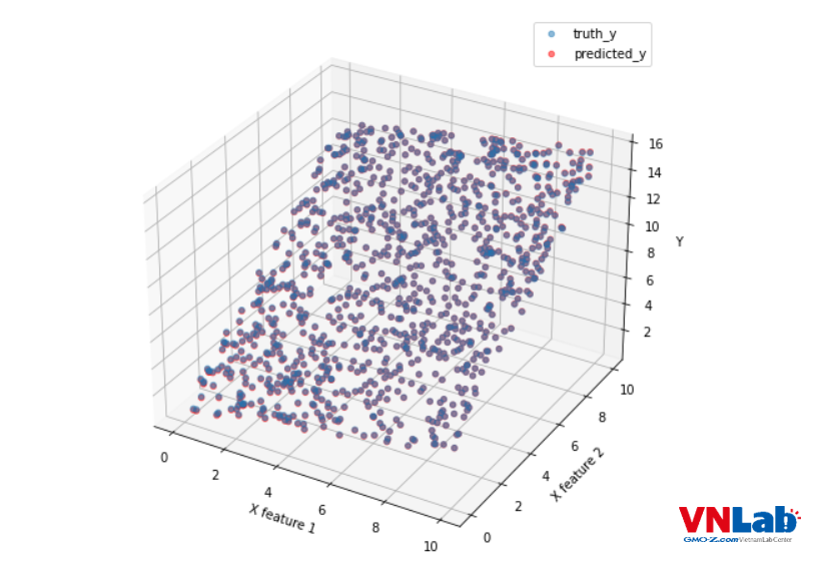
Hình 2: Dự đoán là điểm màu đỏ. Label y là màu xanh nước biển. Tại vì dự đoán và label có giá trị thật khớp nhau nên trở thành màu tím.
Có thể thấy dự đoán và label tạo mặt phẳng giống nhau. Vậy model Linear Regression tạo trên Pytorch đang hoạt động đúng.
Kết luận
Trong quá trình làm, tôi thấy code của Pytorch dễ viết hơn tensorflow, giống như sử dụng một library của python bình thường. Sử dụng tensorflow sẽ thấy phải sử dụng nhiều function riêng mà phải đọc mới hiểu. Hầu hết bug của Pytorch cũng dễ hiểu. Đặc biệt là có nhiều kiểm soát mỗi bước của model.


