Bình thường mới học sử dụng Tensorflow, nhiều bài hướng dẫn sẽ yêu cầu ta download dataset về, và load toàn bộ dataset trên local RAM để sử dụng. Tuy nhiên nếu dữ liệu đến hàng triệu, tỉ dòng dữ liệu trên máy thì sẽ rất nặng.
Trong bài viết này, chúng ta sẽ sử dụng TFRecord và tf.data.Dataset để lưu và xử lý dữ liệu hiệu quả hơn.
TFRecord là gì
TFRecord là định dạng văn bản để lưu trữ một chuỗi các bản ghi nhị phân. Chuyển đổi sang TFRecord có một số lợi thế sau:
- Lưu trữ hiệu quả: dữ liệu TFRecord có thể chiếm ít dung lượng hơn dữ liệu gốc; nó cũng có thể được phân dữ liệu thành nhiều tệp. Khi save dưới dạng nhị phân, ta sẽ tiết kiệm nhiều dung lượng.
2: I/O nhanh: định dạng TFRecord có thể được đọc song song, rất hữu ích khi train trên TPU hoặc nhiều máy chủ. - Tệp độc lập: dữ liệu TFRecord có thể được đọc từ một nguồn duy nhất. Ví dụ như data ảnh ta sẽ có ảnh nhiều folder, label và các chú thích của ảnh (annotation) ở nơi khác. TFRecord sẽ tóm tắt lại dữ liệu về một chỗ.
Bài toán
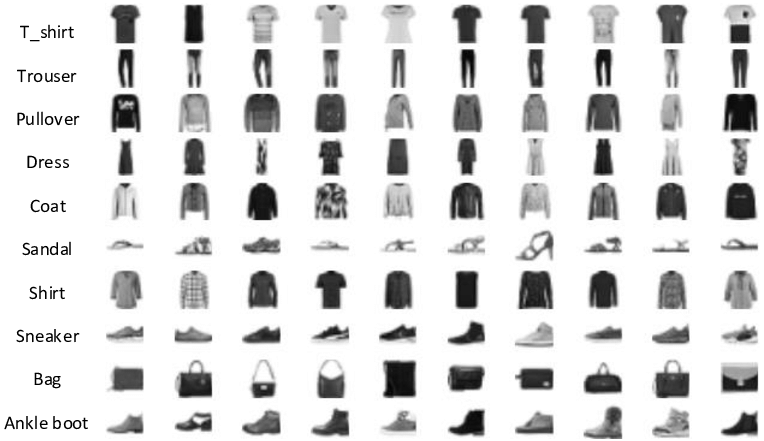
Chúng ta sẽ lưu Fashion MNIST vào TFRecord. Fashion MNIST là dữ liệu về thời trang gồm ảnh và nhãn đây là loại áo quần gì. Nhiệm vụ cua model sẽ là lấy ảnh và đoán loại quần áo và giấy dép, và kiểm tra có đúng với nhãn không.
Save TFRecord
Import các library sử dụng
import tensorflow as tf
import numpy as np
import pandas as pd

from sklearn.model_selection import train_test_split
from tensorflow.train import BytesList, FloatList, Int64List
from tensorflow.train import Feature, Features, Example
Lấy MNIST data về, chia thành 3 phần train, validation và test:
(X_train, y_train), (X_test, y_test) = tf.keras.datasets.fashion_mnist.load_data()
X_train, X_valid, y_train, y_valid = train_test_split(X_train, y_train, stratify=y_train, test_size=0.2, random_state=42, shuffle=True)
Function để viết ảnh và label sử dụng tf.train.Example từ thư viện như ở dưới.
# Just copy this syntax to a T
def create_example(image, label):
    image_example = Example(
        features=Features(
            feature={
                "image": Feature(bytes_list=BytesList(value=[tf.io.serialize_tensor(image).numpy()])),
                "label": Feature(int64_list=Int64List(value=[label]))
            }
        )
    )
    return image_example
Chúng ta sẽ tạo Example sử dụng cả ảnh và label. Mỗi một example được hiểu là một dòng dữ liệu (example/record) dưới dạng protobuf message.
Protocol buffer là bộ đệm giao thức là một thư viện đa nền tảng, đa ngôn ngữ để tuần tự hóa dữ liệu có cấu trúc một cách hiệu quả. Hiểu đơn giản dùng protocol buffer ta có thể chuyển dữ liệu từ máy náy sang máy khác dễ dàng, hiệu quả và theo quy tắc.
Ảnh sẽ được lưu dưới dạng ByteList. Còn label sẽ là số từ 0->9. Mỗi số tương ứng vói một nhãn đồ thời trang, ví dụ 0 là áo sơ mi, 1 là quần dài. Chúng ta lưu label ở dạng IntList.
Chạy ví dụ với ảnh record đầu tiên, index 0 sẽ cho protocol message như dưới:
print(create_example(X_train[0], y_train[0]))
features {
  feature {
    key: "image"
    value {
      bytes_list {
        value: "\010\004\022\..." // Thông tin của ảnh
      }
    }
  }
  feature {
    key: "label"
    value {
      int64_list {
        value: 6
      }
    }
  }
}
Sau đó chúng ta tạo function write_tf_records để viết toàn bộ dữ liệu vào file TFRecord.
def write_tfrecords(f_name, X_data, y_data):
    with tf.io.TFRecordWriter(f_name) as file:
        for image, label in zip(X_data, y_data):
            ex = create_example(image.reshape(28, 28, 1),label)
            file.write(ex.SerializeToString())
Chú ý ở trên ta sử dụng SerializeToString() để viết example dưới dạng chuỗi nhị phân để lưu vào TFRecord:
write_tfrecords("../data/train.tfrecord", X_train, y_train)
write_tfrecords("../data/validation.tfrecord", X_valid, y_valid)
write_tfrecords("../data/test.tfrecord", X_test, y_test)
Load TFRecord
Dưới là code để xử lý TFRecord và trả lại ảnh và label:
def parse_single_example(ser_ex):
    feature_desc = {
        "image": tf.io.FixedLenFeature([], tf.string, default_value=""),
        "label": tf.io.FixedLenFeature([], tf.int64, default_value=-1)
    }
    parsed_ex = tf.io.parse_single_example(ser_ex, feature_desc)
    image = tf.io.parse_tensor(parsed_ex["image"], out_type=tf.uint8)
    image = tf.reshape(image, shape=[28, 28, 1])
    image = tf.cast(image, tf.float64)
    label = parsed_ex["label"]
    return image, label
Có 2 điểm chú thích:
- Chúng ta sẽ viết feature_desc để định nghĩa các feature lưu trong TFRecord được load như thế nào như thế nào.tf.io.FixedLenFeature để
- Sau đó chúng ta đổi image với ma trận ở dạng (28, 28, 1) để model CNN về sau sử dụng được.
Dưới ta se lấy TFrecord và save vào một bộ dữ liệu, bằng TFRecordDataset. Dataset này có các function giúp chúng ta tối ưu hóa việc xử lý dữ liệu và resource trong máy tính.Thay bằng load hết dataset vào RAM, Dataset sẽ đọc từng row dữ liệu và gom lại theo batch (nếu sử dụng batch()).
def get_dataset(filepath, n_read_threads=4, n_parse_threads=4, batch_size=32):
    dataset = tf.data.TFRecordDataset(filepath, num_parallel_reads=n_read_threads)
    dataset = dataset.map(parse_single_example, num_parallel_calls=n_parse_threads)
    dataset = dataset.batch(batch_size)
    return dataset.prefetch(1)
Ở trên, ta đọc song song các dòng trong TFRecord, sử dụng nhiều CPU một lúc.
Sau đó ta sử dụng dataset map để chuyển hóa song song các dòng trong TFRecord thành dạng ảnh và nhãn như ở trên.
Chúng ta gom các dữ liệu thành từng batch bằng command dataset.batch(batch_size).
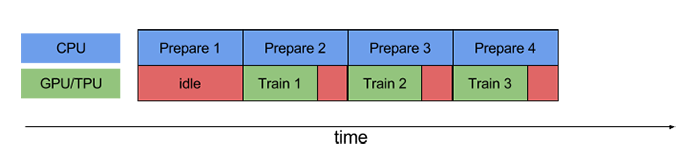
Nếu model đang train, prefetch(1) sẽ yêu cầu CPU lấy một batch dữ liệu để xử lý trước, và gửi ngay, khi model muốn train với batch tiếp theo. Nó là cách tối ưu hóa việc sử dụng CPU trên máy khi GPU đang chạy train.
Tạo bộ dữ liệu cho train, validation và test như ở dưới:
datasets = {
    "train": "../data/train.tfrecord",
    "validation": "../data/validation.tfrecord",
    "test": "../data/test.tfrecord"}

train_dataset = get_dataset(datasets["train"])
validation_dataset = get_dataset(datasets["validation"])
test_dataset = get_dataset(datasets["test"])
Model
Dưới là code để scale dữ liệu và tạo một model CNN để kiểm tra TFRecord có được tạo đúng để model train không. Các bạn có thể skip phần này nếu thấy không cần thiết.
Tạo custom standard layer để tự động scale feature ảnh khi cho vào model. Bạn nào có TF v2.7.0 trở lên có thể sử dụng tf.keras.layers.Normalization
class ImageStandardizeLayer(tf.keras.layers.Layer):
    def __init__(self):
        super(ImageStandardizeLayer, self).__init__()

    def adapt(self, inputs):
        self.mean = tf.math.reduce_mean(inputs, axis=0, keepdims=True)
        self.std = tf.math.reduce_std(inputs, axis=0, keepdims=True)

    def call(self, inputs):
        results = tf.math.divide(tf.math.subtract(inputs, self.mean), (self.std + tf.keras.backend.epsilon()))
        return results
Tạo model CNN để thử train. Bài viết sẽ không giải thích sâu về phần này.
preprocess_layers = [
    ImageStandardizeLayer()
]

nn_layers = [
    tf.keras.layers.Conv2D(filters=64, kernel_size=5, strides=1, padding="same", activation="relu", input_shape=[28, 28, 1]),
    tf.keras.layers.MaxPooling2D(2),
    tf.keras.layers.Conv2D(filters=128, kernel_size=3, strides=1, padding="same", activation="relu"),
    tf.keras.layers.Conv2D(filters=128, kernel_size=3, strides=1, padding="same", activation="relu"),
    tf.keras.layers.MaxPooling2D(2),
    tf.keras.layers.Conv2D(filters=256, kernel_size=3, strides=1, padding="same", activation="relu"),
    tf.keras.layers.Conv2D(filters=256, kernel_size=3, strides=1, padding="same", activation="relu"),
    tf.keras.layers.MaxPooling2D(2),
    tf.keras.layers.Flatten(),
    tf.keras.layers.Dense(50, activation="relu", kernel_initializer="glorot_uniform"),
    tf.keras.layers.Dense(10, activation="softmax")
]

all_layers = preprocess_layers + nn_layers
Function để khởi tạo layer để scale giá trị của ảnh và khởi tạo model.
def init_preprocess(sample_images, preprocess_layers):
    data = sample_images
    for preprocess_layer in preprocess_layers:
        data = preprocess_layer.adapt(sample_images)
    return preprocess_layers

def init_model(preprocess_layers, model_layers):
    model = tf.keras.Sequential(preprocess_layers + model_layers)
    model.compile(loss="sparse_categorical_crossentropy", optimizer="nadam", metrics=["accuracy"])
    return model
log_dir = "../log/tb"
tensorboard_cb = tf.keras.callbacks.TensorBoard(log_dir, update_freq=300)

sample_images = train_dataset.take(100).map(lambda image, label: image)
sample_images = np.concatenate(list(sample_images.as_numpy_iterator()), axis=0).astype(np.float32)
preprocess_layers = init_preprocess(sample_images, preprocess_layers)
model = init_model(preprocess_layers, nn_layers)

model.fit(
    train_dataset,
    validation_data=validation_dataset,
    epochs=10,
    callbacks=[tensorboard_cb],
    verbose=2
)
Output sẽ như dưới, cho thấyy model train được với dữ liệu qua TFRecordDataset:
Epoch 1/10
1500/1500 - 24s - loss: 0.4435 - accuracy: 0.8423 - val_loss: 0.3284 - val_accuracy: 0.8857
Epoch 2/10
1500/1500 - 16s - loss: 0.2755 - accuracy: 0.8984 - val_loss: 0.2822 - val_accuracy: 0.9024
Epoch 3/10
1500/1500 - 16s - loss: 0.2224 - accuracy: 0.9179 - val_loss: 0.3279 - val_accuracy: 0.8985
Epoch 4/10
1500/1500 - 16s - loss: 0.1869 - accuracy: 0.9301 - val_loss: 0.3103 - val_accuracy: 0.9046
Epoch 5/10
1500/1500 - 16s - loss: 0.1696 - accuracy: 0.9392 - val_loss: 0.3924 - val_accuracy: 0.8932
Epoch 6/10
1500/1500 - 16s - loss: 0.1388 - accuracy: 0.9485 - val_loss: 0.3361 - val_accuracy: 0.9097
Epoch 7/10
1500/1500 - 17s - loss: 0.1267 - accuracy: 0.9530 - val_loss: 0.3767 - val_accuracy: 0.9081
Epoch 8/10
1500/1500 - 17s - loss: 0.1213 - accuracy: 0.9554 - val_loss: 0.3966 - val_accuracy: 0.9090
Epoch 9/10
1500/1500 - 16s - loss: 0.1069 - accuracy: 0.9602 - val_loss: 0.4304 - val_accuracy: 0.9080
Epoch 10/10
1500/1500 - 16s - loss: 0.0963 - accuracy: 0.9654 - val_loss: 0.4314 - val_accuracy: 0.9102
Train và Validation Accuracy trên 90%. Có dấu hiệu hơi overfit nhưng không đến nỗi tệ.
Kết luận
Tổng kết lại chúng ta đã:
- Save ảnh và label vào TFRecord
- Load TFRecord sử dụng TFRecordDataset
- Tạo model CNN để thử train với Dataset
Chúc các bạn may mắn với việc áp dụng vào dự án.