Thời gian vừa rồi mình có tham gia một dự án sử dụng Nest.js. Hôm nay nhân lúc rảnh rỗi, ngồi note lại một số thứ mình đã học được trong quá trình làm dự án. Cụ thể mình định trình bày về Middleware, Guard và Inteceptor. Tuy nhiên, mình thấy khá là thiếu sót cũng như hơi bị cụt khi tự dưng trình bày về 3 vấn đề này. Vì vậy, nên mình xin khái quát về quy trình của một request-response trong ứng dụng Nest.js. Trong doc không có tổng hợp về vấn đề này và trình bày các khái niệm theo mình thấy không có sự kết nối với nhau lắm. Nên nếu bạn không muốn đọc dài, mình sẽ tóm tắt và trình bày theo cách hiểu của mình. Hy vọng sau bài viết này, bạn sẽ có cái nhìn khách quan hơn về những gì sẽ xảy ra khi người dùng gửi một request tới một Nest.js server và hiểu được mục đích sử dụng của từng khái niệm trong đó.
I. Tổng quan
Để mọi thứ rõ ràng hơn, mình có viết lại sơ đồ như bên dưới.
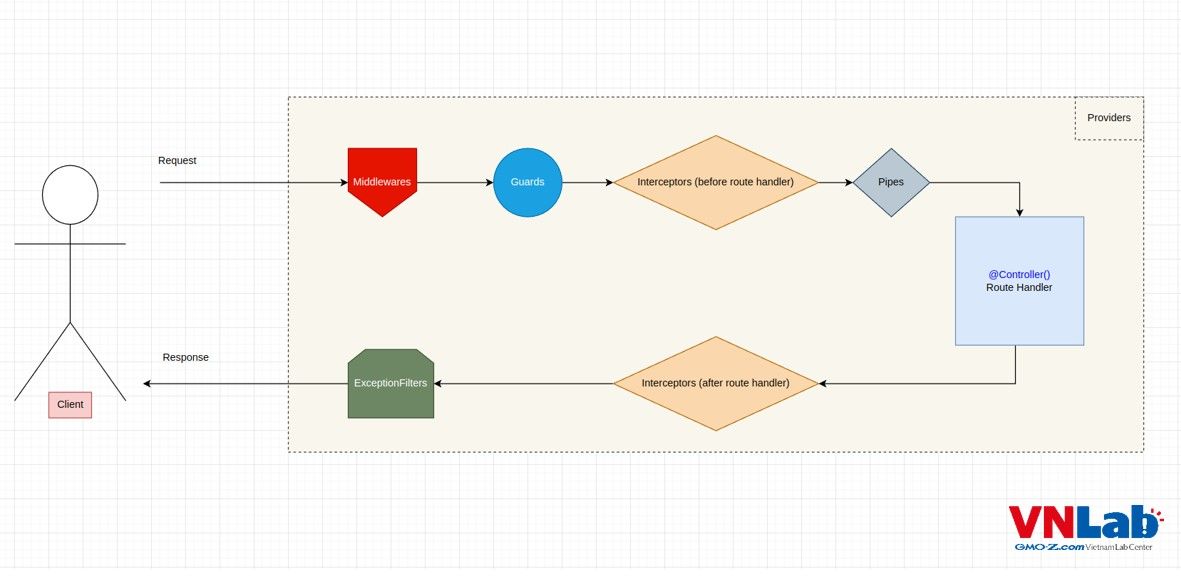
1. Middleware
Middleware là thứ đầu tiên mà một request được gửi lên từ server sẽ "diện kiến". Qua quá trình sử dụng thì mình thấy Middleware thật sự không hẳn là một thứ gì đó specific của Nest.js do tất cả những gì middleware làm trên Nest.js đã được Express.js hỗ trợ hết, và đơn giản Nest.js chỉ implement lại nó. Middleware của Nest.js có hỗ trợ những thứ như cors, body-parser, morgan và có thể tích hợp được cả các tính năng third-party dành cho middleware của express.js vào.
Middleware là một nơi lí tưởng để làm những việc liên quan đến authentication, validate Json Web Token hoặc cũng có thể đính thêm các properties cần thiết vào trong request. Chẳng hạn, khi bạn gửi request để login user chẳng hạn, thì Middleware sẽ là nơi lý tưởng để bạn validate xem user đó có tồn tại trong hệ thống hay không. Rồi sau đó, sau khi validate xong, có thể đính thêm properties user_id của user đó vào trong request để cho dễ dàng các bước tiếp theo.
2. Guard
Theo sơ đồ, ta có thể thấy Guard được thực thi sau tất cả các lớp Middleware, nhưng trước Interceptor và Pipe. Guard implements interface CanActive.Hiểu một cách đơn giản, chỉ cần thỏa mãn interface CanActive là request có thể vượt qua được lớp guard này để tiến tới router handler.
Guard thường được dùng cho chức năng Authorization của ứng dụng. Ví dụ: Khi đã qua được lớp middleware, chúng ta check xem role của user đó có được quyền truy cập được vào router handler để lấy dữ liệu tương ứng không.
3. Interceptor
Interceptor là thứ quyền lực nhất (theo đánh giá của mình) trong việc xử lý form request-response. Interceptor có thể access trực tiếp vào request trước khi nó đến router handler và có thể truy cập vào response sau khi router handler đã xử lý. Việc này giúp cho việc tùy biến response trở nên dễ dàng.
- Xử lý trước khi vào router handle: viết code logic xử lý trước khi
next.handle()được gọi. - Xử lí sau khi vào router handler: viết code xử lý trong
next.handle().pipe(tap() => changeRespone()) - Có thể làm các việc như: tính xem request mất bao nhiêu thời gian trước khi và sau khi vào router handler; handle các error global, v..v.. Bởi vì độ đa dụng và tính năng mạnh mẽ của interceptor nên có vô hạn cách dùng.
Với sức mạnh như vậy, các bạn có thể sử dụng Interceptor để tính xem request mất bao nhiêu thời gian trước khi và sau khi vào router handler; tùy biến các error global (nếu không sử dụng ErrorFilter mà mình sẽ đề cập đến tiếp theo), v..v.. Bởi vì độ đa dụng và tính năng mạnh mẽ của mình, nên Interceptor có thể tùy biến và có vô hạn cách sử dụng.
4. Pipe
Pipes là lớp nằm giữa Interceptor đầu vào và router handler. Các bạn có thắc mắc tại sao đã gặp mặt bao nhiêu lớp rồi mà lại chèn thêm Pipe vào nữa không?
Sau khi validate và tùy biến response từ các lớp Middleware, Guard và Interceptor, Pipe là cánh cửa cuối cùng để request được "thanh lọc". Pipes cho phép thay đổi request object. Chúng ta có thể sử dụng nó để thay đổi hoàn toàn data thành các form khác mà chúng ta muốn trước khi đến router handler.
Ngoài ra, Pipe cũng được sử dụng cho mục đích validate các tham số của request. Chẳng hạn như chúng ta muốn tham số được truyền vào trong body của request phải là dạng json , hay tham số của ngày tháng năm sinh của user là một object. Pipe sẽ là nơi để validate tham số. Ngoài các built-in pipes mà nest.js hỗ trợ sẵn, thì còn có thể tự custom hoặc sử dụng thư viện ngoài. Một trong những thư viện mình đã dùng và được trang chủ recommend đó là class-validator và class-transformer, hỗ trợ rất nhiều các decorator-based validation. decorator-based validation cực kỳ mạnh mẽ, đặc biệt khi được kết hợp với các Pipe vì có thể truy cập vào metatype của property. Các bạn có thể tìm hiểu thêm ở đây.
5. Exception Filter
Về cơ bản, Exception Filter giống như khối catch trong đọan try-catch của cả quy trình request-response. Nó trả về HttpException hoặc bất cứ Exception nào mình mong muốn. Chúng ta có thể tự custom Exception mà mình mong muốn rồi thêm nó vào Exception Filter, để bắn ra một lỗi nào đó thân thiện với người dùng, hoặc là một flag để phân biệt một lỗi nào đó cụ thể để bên client có thể handle được mã lỗi đó một cách dễ dàng.
6. Provider
Theo sơ đồ ở trên, không phải Provider không tham gia vào chu trình request-response đâu nhé.
Providers là một khái niệm cơ bản của Nest.js. Tất cả các class của Nest.js như services, repository, factory, helper, v..v đều có thể là provider. Nó có thể tham gia tất cả các bước trong chu trình request-response thông qua Dependencies Injection. Muốn dùng service nào, chúng ta chỉ cần khai báo service đó trong module, và sử dụng thông qua constructor của class.
II. Cách khai báo
Chúng ta có nhiều cách để khai báo các thành phần này đối với một module. Cụ thể, chúng ta có 3 cách chính:
1. Khai báo trong src/main.ts
Đây là cách để chúng ta khai báo các middleware, guard, interceptor..v..v.. mang tính global, áp dụng chung đối với tất cả các module.
import { NestFactory } from '@nestjs/core';
import { AppModule } from './app.module';
import { HttpExceptionFilter } from './filters/http-exception.filter';
import { AuthGuard } from './guards/auth.guard';
import { AuthenticationMiddleware } from './middleware/authentication.middleware';
import { FreezePipe } from './pipes/freeze.pipe';

async function bootstrap() {
  const app = await NestFactory.create(AppModule);
  // middleware declaration
  app.use(new AuthenticationMiddleware());

  // guard declaration
  app.useGlobalGuards(new AuthGuard());

  // pipe declaration
  app.useGlobalPipes(new FreezePipe());

  // exception filter declaration
  app.useGlobalFilters(new HttpExceptionFilter());
  await app.listen(12345);
}
bootstrap();
Tuy nhiên, đây chỉ là một cách để khai báo một cách chung chung để áp dụng với tất cả các module thôi. Chắc chắn trong app của chúng ta sẽ có nhiều tính năng mà chúng ta chỉ muốn áp dụng tùy từng thành phần vào từng module thôi. Chẳng hạn, sẽ có những module bạn muốn áp dụng Guard để authorize các role cụ thể có thể truy cập vào resource, nhưng có module bạn lại không muốn áp dụng vì module đó là public, bất kì user nào cũng có thể truy cập để lấy resource. Vì vậy, chỉ dùng cách này khi bạn thật sự muốn áp dụng chung đối với tất cả module. Ngoài ra, cách này cũng không phải là một cách tối ưu khi bạn sử dụng dependencies injection, vì file main.ts nằm ngoài luồng request-response nên dependencies sẽ không thể inject vào được.
2. Khai báo trong file ....module.ts
Với cách khai báo này, chúng ta có thể khai báo cụ thể những gì chúng ta muốn áp dụng cho modules.
Đối với Middleware:
export class AppModule implements NestModule {
  configure(consumer: MiddlewareConsumer) {
    consumer.apply(AuthenticationMiddleware).forRoutes('*');
    // .forRoutes({ path: '/path', method: RequestMethod.GET });
  }
}
Chúng ta implements NestModule inteface, trong hàm configure, sử dụng consumer.apply(AuthenticationMiddleware).forRoutes('*') khi chúng ta muốn apply cho tất cả các Route của api trong module. Nếu các bạn muốn apply cho từng api cụ thể, thì chúng ta cũng có thể khai báo với path cụ thể:
....
        consumer.apply(AuthenticationMiddleware).forRoutes({ path: '/path', method: RequestMethod.GET });
....
Đối với Guard, Interceptor, ExceptionFilter, Pipe:
Implement bằng cách khai báo trong array của providers:
...

@Module({
  imports: [],
  controllers: [AppController],
  providers: [
    AppService,
    RequestService,
    {
      provide: APP_GUARD,
      useClass: AuthGuard,
    },
    {
      provide: APP_INTERCEPTOR,
      // scope must be defined since we inject a request-scope dependencies
      scope: Scope.REQUEST,
      useClass: LoggingInterceptor,
    },
    {
      provide: APP_FILTER,
      useClass: HttpExceptionFilter,
    },
  ],
})
export class AppModule implements NestModule {
  configure(consumer: MiddlewareConsumer) {
    consumer.apply(AuthenticationMiddleware).forRoutes('*');
  }
}
Lưu ý: khi sử dụng dependencies injection, với những dependencies thuộc scope REQUEST thì chúng ta phải khai báo scope cho provider.
3. Khai báo sử dụng Decorators
Nest.js hỗ trợ chúng ta hệ thống Decorators rất mạnh. chúng ta có thể sử dụng @UseGuards(), UseInterceptors(),... tương ứng với từng api khai báo trong file controller. Chúng ta không có decorator cho middleware, vì middleware có thể apply cho router từ tận bên ngoài module (các bạn có thể xem phần thảo luận ở đây).
@Controller()
export class AppController {
  constructor(private readonly appService: AppService) {}

  @Get()
  @UseGuards(AuthGuard)
  @UseInterceptors(LoggingInterceptor)
  @UseFilters(HttpExceptionFilter)
  @UsePipes(FreezePipe)
  getHello(): string {
    return this.appService.getHello();
  }
}
III. Code thôi nào
Để các bạn dễ nắm bắt, mình sẽ demo 1 ví dụ đơn giản sử dụng đầy đủ tất cả thành phần trong chu trình này.
Đầu tiên, các bạn khởi tạo dự án với câu lệnh:
nest new nestjs-request-response-lifecyclesau đó dùng lệnh này để khởi động server:
cd nestjs-request-response-lifecycle
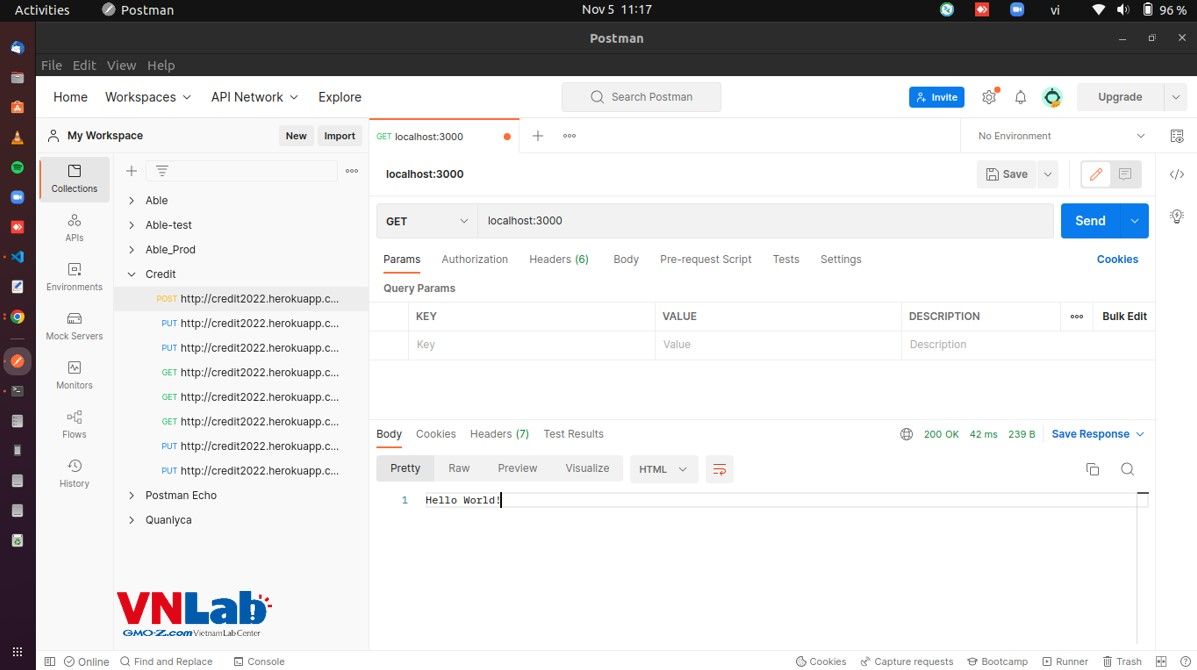
npm run start:devMình dùng Postman để test API, nếu các bạn chạy server localhost:3000 ra như dưới là thành công nhé:
Đầu tiên mình sẽ khởi tạo 1 Provider:
/// src/utils/request.service.ts

import { Injectable, Scope } from '@nestjs/common';

@Injectable({ scope: Scope.REQUEST })
export class RequestService {
  private userId: string;

  setUserId(userId: string) {
    this.userId = userId;
  }

  getUserId() {
    return this.userId;
  }
}
Dependency này không có gì đặc biệt, mình dùng decorator @Injectable() để khai báo với scope là REQUEST và gồm có 2 hàm setter/getter. Để sử dụng nó trong module, thì phải thêm RequestService vào provider của AppModule:
/// src/app.module.ts

import { Module } from '@nestjs/common';
import { AppController } from './app.controller';
import { AppService } from './app.service';
import { RequestService } from './utils/request.service';

@Module({
  imports: [],
  controllers: [AppController],
  providers: [AppService, RequestService], // add here
})
export class AppModule {}
Tiếp đến, chúng ta khởi tạo Middleware:
/// src/middleware/authentication.middleware.ts

import { Injectable, Logger, NestMiddleware } from '@nestjs/common';
import { NextFunction, Request, Response } from 'express';
import { RequestService } from 'src/utils/request.service';

@Injectable()
export class AuthenticationMiddleware implements NestMiddleware {
  private readonly logger = new Logger(AuthenticationMiddleware.name);
  constructor(private readonly requestService: RequestService) {}
  use(req: Request, res: Response, next: NextFunction) {
    this.logger.log(AuthenticationMiddleware.name);
    // Authenticate the request
    const userId = '123';
    this.requestService.setUserId(userId);

    next();
  }
}
Trong Middleware này, mình inject RequestService vào. Skip qua phần authentication, gắn trực tiếp một giá trị userId vào trong giá trị userId ở trong RequestService.
để apply middleware, mình apply nó trong file module.ts đối với tất cả các route.
/// src/app.module.ts

import {
  MiddlewareConsumer,
  Module,
  NestModule,
} from '@nestjs/common';
import { AppController } from './app.controller';
import { AppService } from './app.service';
import { AuthenticationMiddleware } from './middleware/authentication.middleware';
import { RequestService } from './utils/request.service';

@Module({
  imports: [],
  controllers: [AppController],
  providers: [AppService, RequestService],
})
export class AppModule implements NestModule {
  configure(consumer: MiddlewareConsumer) {
    consumer.apply(AuthenticationMiddleware).forRoutes('*');
  }
}
Guard:
/// src/guards/auth.guard.ts

import {
  CanActivate,
  ExecutionContext,
  Injectable,
  Logger,
} from '@nestjs/common';
import { Observable } from 'rxjs';
import { RequestService } from 'src/utils/request.service';

@Injectable()
export class AuthGuard implements CanActivate {
  private readonly logger = new Logger(AuthGuard.name);
  constructor(private readonly requestService: RequestService) {}

  canActivate(
    context: ExecutionContext,
  ): boolean | Promise<boolean> | Observable<boolean> {
    if (this.requestService.getUserId() === 1) {
      this.logger.log('You are admin. You can continue.');
      return true;
    } else {
      this.logger.log('You are not admin. Access denied');
      return false;
    }
  }
}
Trong guard này, mình làm chức năng authorization, tiếp tục inject RequestService vào trong guard để lấy giá trị userId, mình hard code user có id = 1 là admin, nếu là admin thì có thể vượt qua Guard còn không thì sẽ báo lỗi và trả về http status = 403.
Interceptor:
/// src/interceptors/logging.interceptor.ts

import {
  CallHandler,
  ExecutionContext,
  Injectable,
  Logger,
  NestInterceptor,
} from '@nestjs/common';
import { Observable, tap } from 'rxjs';
import { RequestService } from 'src/utils/request.service';

@Injectable()
export class LoggingInterceptor implements NestInterceptor {
  private readonly logger = new Logger(LoggingInterceptor.name);

  constructor(private readonly requestService: RequestService) {}

  intercept(
    context: ExecutionContext,
    next: CallHandler<any>,
  ): Observable<any> | Promise<Observable<any>> {
    const request = context.switchToHttp().getRequest();
    const userAgent = request.get('user-agent') || '';
    const { ip, method, path: url } = request;
    this.logger.log(
      `${method} ${url} ${userAgent} ${ip}: ${context.getClass().name} ${
        context.getHandler().name
      } invoked...`,
    );

    this.logger.debug(`userId: ${this.requestService.getUserId()}`);

    const now = Date.now();

    return next.handle().pipe(
      tap((res) => {
        const response = context.switchToHttp().getResponse();
        const { statusCode } = response;
        const contentLength = response.get('content-length');

        this.logger.log(
          `${method} ${url} ${statusCode} - ${userAgent} ${ip}: ${
            Date.now() - now
          }ms`,
        );

        this.logger.debug(`Response:${res}`);
      }),
    );
  }
}
Trong LoggingInterceptor này, mình tiếp tục inject RequestService vào để các bạn thấy được chúng ta có thể sử dụng service như là một Provider xuyên suốt lifecycle. Trong Interceptor này, mình log ra các thông số như method, url, userAgent, v..v. Trước router handler, mình log ra giá trị của userId trong RequestService, và sau router handle mình log ra thời gian hoàn thành request và cả response.
Pipe:
Với Pipe, mình tích hợp thêm thư viện class-validator, các bạn có thể tham khảo ở đây. Đầu tiên chúng ta chạy câu lệnh để add thư viện vào project:
npm i --save class-validator class-transformerSau khi add xong, các bạn tạo 1 file dto cho request:
// src/dto/create-example.dto.ts

import { IsString, IsInt } from 'class-validator';

export class CreateExampleDto {
  @IsString()
  name: string;

  @IsInt()
  userId: number;
}
File dto này có 2 tham số là name và userId. Với việc sử dụng decorator IsString() và IsInt(), chúng ta đã định nghĩ kiểu type cần thiết cho 2 tham số này từ request.
Tiếp đến chúng ta tạo Pipe:
// src/pipes/validation.pipe.ts

import {
  PipeTransform,
  Injectable,
  ArgumentMetadata,
  BadRequestException,
  Logger,
} from '@nestjs/common';
import { validate } from 'class-validator';
import { plainToInstance } from 'class-transformer';
import { RequestService } from 'src/utils/request.service';

@Injectable()
export class ValidationPipe implements PipeTransform<any> {
  private readonly logger = new Logger(ValidationPipe.name);
  constructor(private readonly requestService: RequestService) {}
  async transform(value: any, { metatype }: ArgumentMetadata) {
    value.userId = this.requestService.getUserId();

    if (!metatype || !this.toValidate(metatype)) {
      return value;
    }
    const object = plainToInstance(metatype, value);
    const errors = await validate(object);
    if (errors.length > 0) {
      throw new BadRequestException('Validation failed');
    }
    return value;
  }

  // eslint-disable-next-line @typescript-eslint/ban-types
  private toValidate(metatype: Function): boolean {
    // eslint-disable-next-line @typescript-eslint/ban-types
    const types: Function[] = [String, Boolean, Number, Array, Object];
    return !types.includes(metatype);
  }
}
Trong ValidationPipe, chúng ta sẽ validate các giá trị cần thiết từ body của request. Ngoài ra, mình sẽ gắn thêm giá trị userId từ provider RequestService vào đối với tham số userId (đã được định nghĩa trong file dto). Nếu request truyền không đúng params cần thiết thì sẽ trả về lỗi BadRequest.
Để sử dụng Pipe, chúng ta tạo thêm 1 method Post trong Controller rồi sử dụng Pipe thông qua decorator như sau:
/// src/app.controller.ts

import {
  Body,
  Controller,
  Get,
  InternalServerErrorException,
  Post,
  UseGuards,
  UseInterceptors,
  UsePipes,
} from '@nestjs/common';
import { AppService } from './app.service';
import { CreateExampleDto } from './dto/create-example.dto';
import { AuthGuard } from './guards/auth.guard';
import { LoggingInterceptor } from './interceptors/logging.interceptor';
import { ValidationPipe } from './pipes/validation.pipe';
import { RequestService } from './utils/request.service';

@Controller()
export class AppController {
  constructor(
    private readonly appService: AppService,
    private readonly requestService: RequestService,
  ) {}

  @Get()
  getHello(): string {
    return this.appService.getHello();
  }

  @Post()
  @UsePipes(ValidationPipe)
  postExample(@Body() body: CreateExampleDto) {
    this.appService.postExample();
  }
 }
Tiếp đến chúng ta khởi tạo Exception Filter:
// src/filters/http-exception.filter.ts

import {
  ArgumentsHost,
  Catch,
  ExceptionFilter,
  HttpException,
  Logger,
} from '@nestjs/common';
import { Request, Response } from 'express';

@Catch(HttpException)
export class HttpExceptionFilter implements ExceptionFilter {
  private readonly logger = new Logger(HttpExceptionFilter.name);
  catch(exception: HttpException, host: ArgumentsHost) {
    this.logger.debug(exception.name);
    const ctx = host.switchToHttp();
    const response = ctx.getResponse<Response>();
    const request = ctx.getRequest<Request>();
    const status = exception.getStatus();

    response.status(status).json({
      statusCode: status,
      timestamp: new Date().toISOString(),
      path: request.url,
    });
  }
}
Exception Filter này chúng ta đơn giản sẽ custom lại json lỗi trả về.
Sau khi tạo xong Exception Filter, chúng ta cùng 1 lúc add Guard, Interceptor, ExceptionFilter vào module. File module hoàn thiện sẽ như sau:
// src/app.module.ts

import {
  MiddlewareConsumer,
  Module,
  NestModule,
  RequestMethod,
  Scope,
} from '@nestjs/common';
import { APP_FILTER, APP_GUARD, APP_INTERCEPTOR, APP_PIPE } from '@nestjs/core';
import { AppController } from './app.controller';
import { AppService } from './app.service';
import { HttpExceptionFilter } from './filters/http-exception.filter';
import { AuthGuard } from './guards/auth.guard';
import { LoggingInterceptor } from './interceptors/logging.interceptor';
import { AuthenticationMiddleware } from './middleware/authentication.middleware';
import { RequestService } from './utils/request.service';

@Module({
  imports: [],
  controllers: [AppController],
  providers: [
    AppService,
    RequestService,
    {
      provide: APP_GUARD,
      scope: Scope.REQUEST,
      useClass: AuthGuard,
    },
    {
      provide: APP_INTERCEPTOR,
      // scope must be defined since we inject a request-scope dependencies
      scope: Scope.REQUEST,
      useClass: LoggingInterceptor,
    },
    {
      provide: APP_FILTER,
      useClass: HttpExceptionFilter,
    },
  ],
})
export class AppModule implements NestModule {
  configure(consumer: MiddlewareConsumer) {
    consumer.apply(AuthenticationMiddleware).forRoutes('*'); //-> for globally, for every single route
    // .forRoutes({ path: '/path', method: RequestMethod.GET });
  }
}
Rồi và sau đây sẽ là bước kiểm tra thành quả :D
Khi chạy Postman url localhost:3000 với method GET thành công.
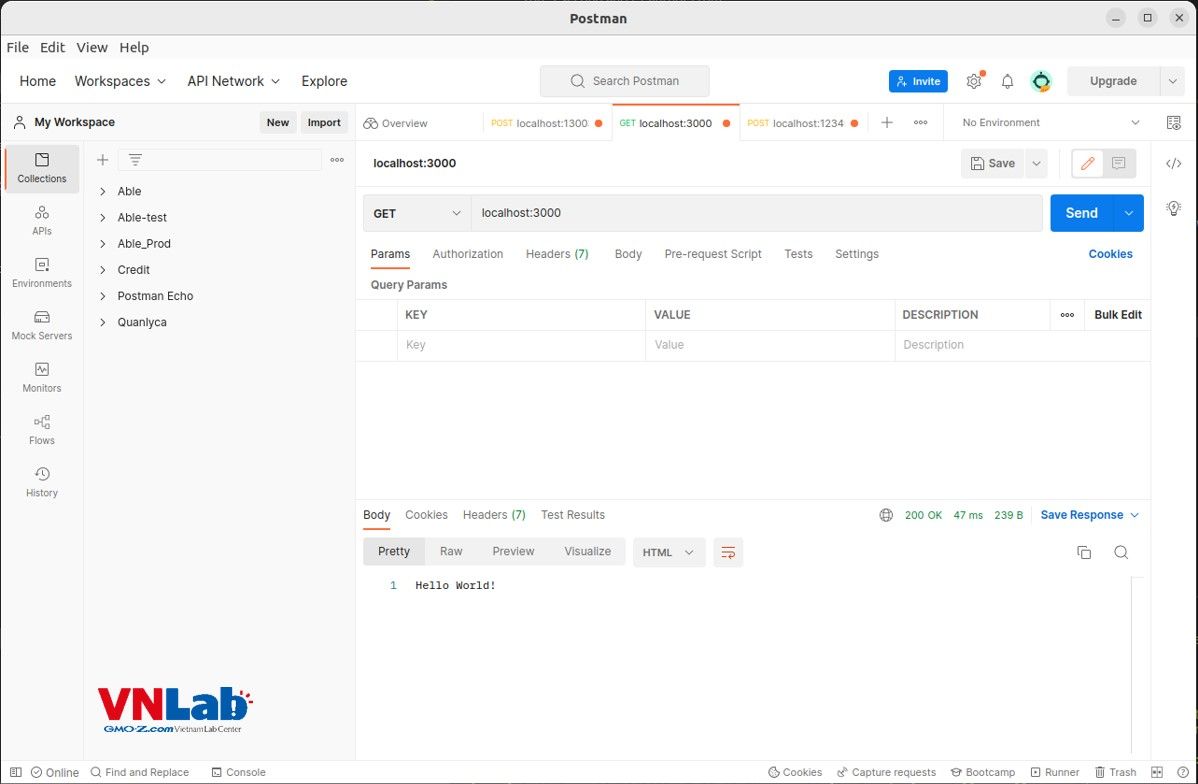
Giờ chúng ta xem log sẽ có được thứ tự log như sau:

Các bạn có thể thấy, đúng như luồng sơ đồ mình vẽ phía trên, từ AuthenticationMiddleware -> AuthGuard -> LoggingInterceptor -> AppService(Router Handler) ->LoggingInterceptor . Rất rõ ràng.
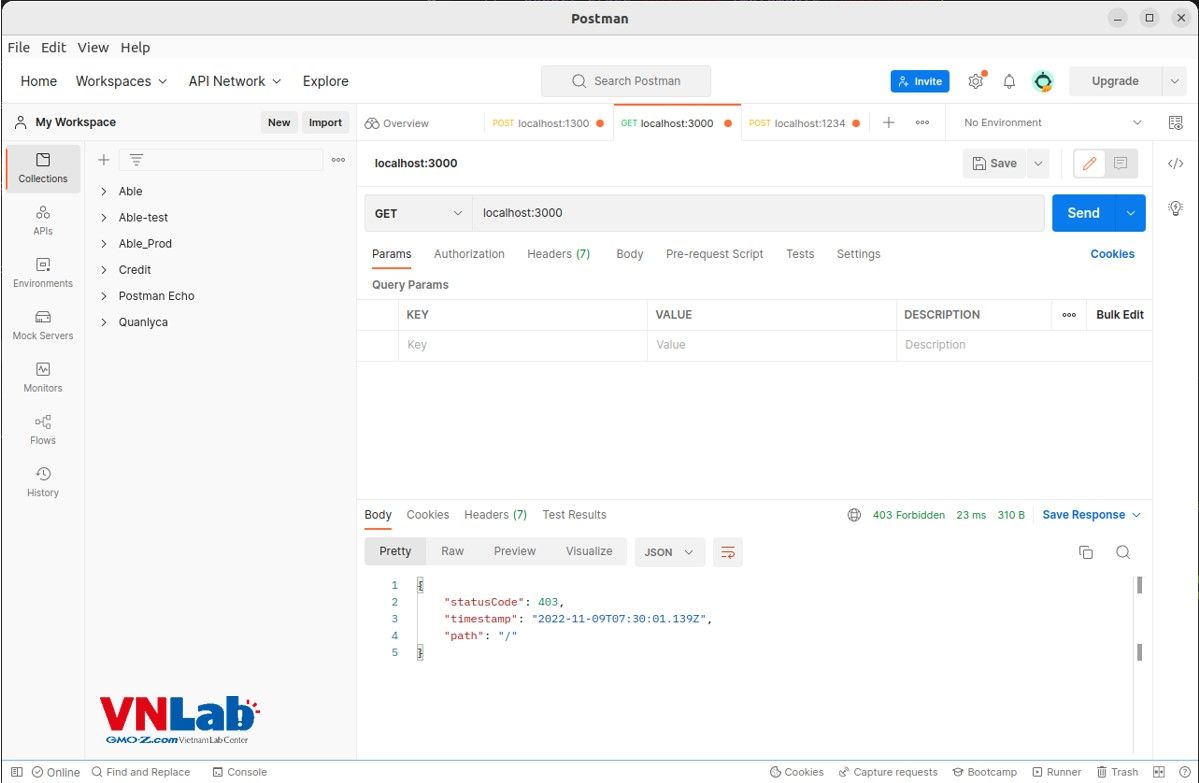
Chẳng hạn chúng ta cố tình sửa giá trị hard code của userId ở bước Middleware = 2. Điều đó đồng nghĩa với luồng của chúng ta sẽ kết thúc ở Guard và Exception Filter mà chúng ta đã custom sẽ handle lỗi.

Tiếp đến chúng ta sẽ check xem cách Pipe hoạt động. Chúng ta chạy Postman url localhost:3000 với method POST và không truyền params nào trong body của request cả.
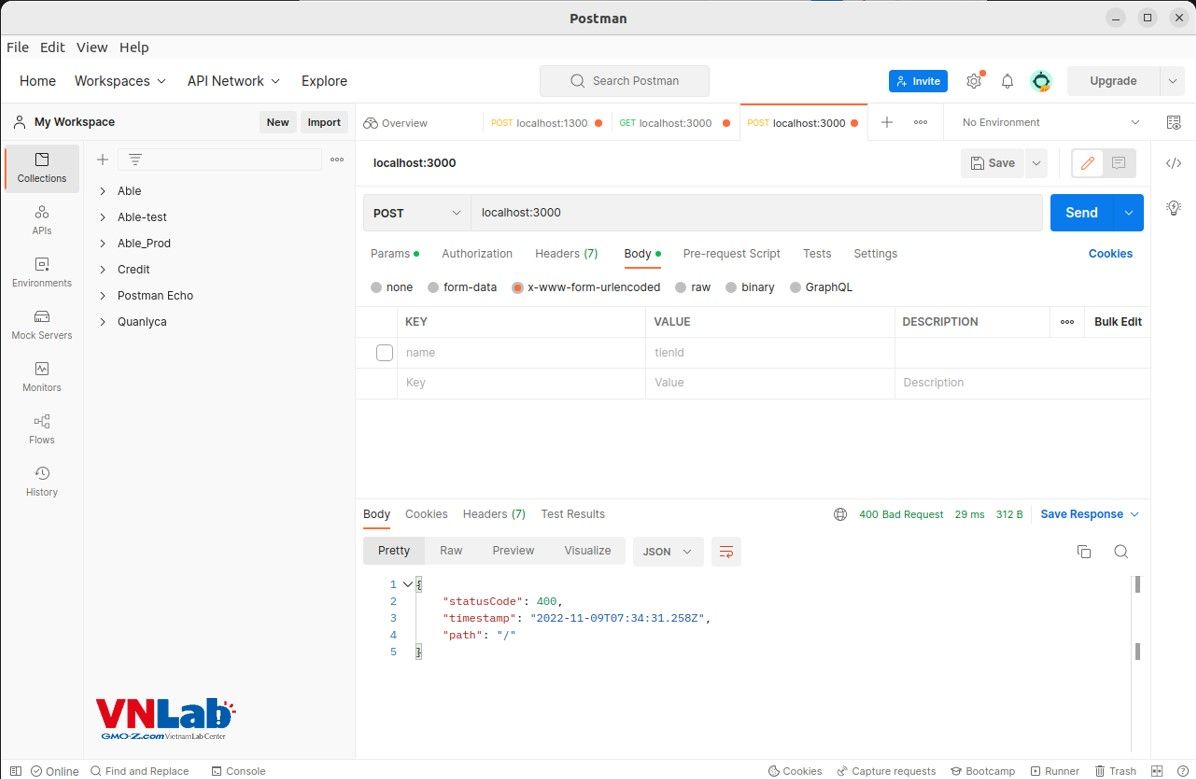
Đúng như dự đoán, Pipe đã bắn ra lỗi BadRequest như code logic chúng ta đã viết.

Để chạy thông luồng, chúng ta sẽ truyền thêm tham số name với value là string vào trong body của request, vì tham số userId đã được mình truyền vào trong Pipe nên chúng ta không cần nữa. Và kết quả là các bạn có thể thấy rõ được luồng của nó thông qua đoạn log dưới đây.

IV. Tổng kết
Trên đây, mình đã khái quát lại cho các bạn chức năng chính và phân biệt công dụng của từng thành phần trong một request-response cycle của ứng dụng NestJS. Tất nhiên, bài blog này của mình chỉ tổng hợp lại kiến thức và một số chú ý mà mình học hỏi được khi sử dụng Nest.js. Nếu muốn tìm hiểu cụ thể, chi tiết từng phần, các bạn hãy vào đọc document trên trang chủ nhé. Về phần demo, các bạn có thể xem code tại đây. Hẹn gặp lại các bạn trong cái bài blog tiếp theo.