Vừa rồi trong dự án mình có tìm hiểu và sử dụng thằng Google Vision API. Nó dùng để detect các text trong hình ảnh hoặc file như pdf.
Bài viết này sẽ chia sẻ về cách detect hình ảnh và file bằng 2 cách.
- Dùng trực tiếp api
- Dùng thư viện client
Vì cách detect cho file ảnh khác với pdf nên mình sẽ demo luôn 2 cách. Mình sẽ dùng javascript để code demo.
I. Sử dụng Google Vision API
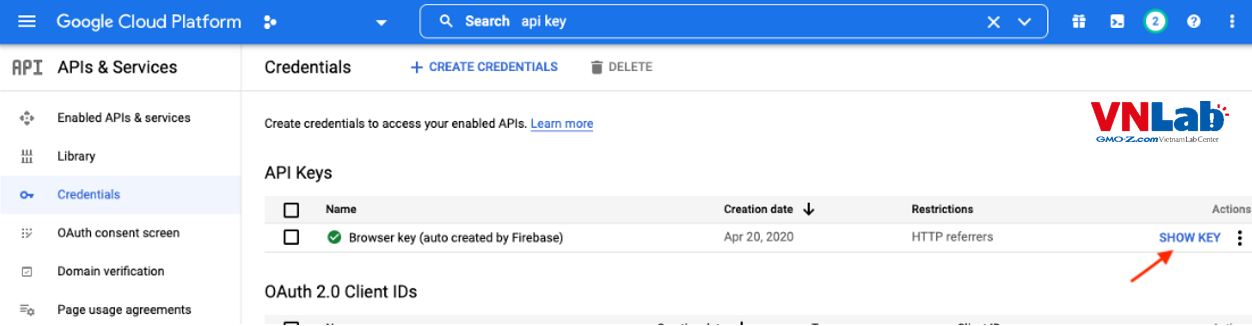
1. Chuẩn bị key
Nếu sử dụng api, bạn phải chuẩn bị key. Tất nhiên là bạn phải có account google và truy cập vào được google console nhé.
2. Yêu cầu môi trường
- Nodejs
- NPM
3. Bắt đầu code
- Khởi tạo source code
mkdir my-demo
cd my-demo
npm init
- Cài thư viện cần thiết
npm install request
① Code detect với file pdf
Tạo file server.js và viết code sau:
const request = require('request');
const fs = require("fs");

const filePath = './invoice_pdf.pdf';
const file = fs.readFileSync(filePath);
const KEY = 'Axxxxxxxxxxxxxxxxxxxxxxxxxxxxxxxxxxxxx';

const data = {
    requests: [
      {
        inputConfig: { content: Buffer.from(file).toString("base64") , mimeType: 'application/pdf' },
        features: [
          {
            type: "DOCUMENT_TEXT_DETECTION",
          },
        ]
      },
    ],
};

request.post({
    headers: {'content-type' : 'application/json'},
    url: `https://vision.googleapis.com/v1/files:annotate?key=${KEY}`,
    json: data
}, function(error, response, body){
    console.log(body);
});
-
Tại sao dữ liệu request api lại được định nghĩa như trên thì các bạn có thể tham khảo document của google vision, chúng được định nghĩa khá rõ ràng.
-
inputConfig.content: là string bas64, nên mình đã dùng hàm convert file thành base64. -
features: là loại detection. Mình sử dụngDOCUMENT_TEXT_DETECTIONđể detect text trong file. -
/files:annotate: là api để detect file một cách đồng bộ. Ngoài ra Google Vision còn hỗ trợ cả detect bất đồng bộ nữa. Bạn có thể tham khảo các loại detect mà Google Vision đã cung cấp tại đây. -
Run code
node server.js
- Response sẽ có dạng cấu trúc như sau:
{
  "responses": [
    {
      "responses": [
        "fullTextAnnotation": {
          "pages": [...],
          "text": "有限会社GMO 田中太郎様\n件名: 11月分記事投稿の請求書\n"
        },
        "context": {
          "pageNumber": 1
        }
      ],
      "totalPages": 1
    }
  ]
}
Dựa vào response này bạn có thể lấy ra những thông tin cần thiết để tiếp tục turning sao cho dữ liệu trở nên phù hợp với chương trình bạn đang viết.
Trong response trên, 2 thông số cần lưu tâm nhất là text với pages.
textlà tất cả các chữ xuất hiện trên page đó của file pdf. Trong response trên thì file pdf của mình có chứa các text như有限会社GMO 田中太郎様,11月分記事投稿の請求書.pagessẽ cho bạn thông tin tọa độ của chữ đó trên page.
② Code detect với file image
Cũng không khác gì mấy so với detect file pdf. Ở image thì url sẽ khác, và param truyền lên cũng khác một ít.
const filePath = './invoice.jpg';
const fileBase64 = fs.readFileSync(filePath, {encoding: 'base64'});
const KEY = 'Axxxxxxxxxxxxxxxxxxxxxxxxxxxxxxxxxxxxx';

const data = {
    requests: [
      {
        image: { content: fileBase64 },
        features: [
          {
            type: "DOCUMENT_TEXT_DETECTION",
          },
        ],
      },
    ],
};

request.post({
    headers: {'content-type' : 'application/json'},
    url: `https://vision.googleapis.com/v1/images:annotate?key=${KEY}`,
    json: data
}, function(error, response, body){
    console.log(body);
});
image.content: cũng là string base64/images/annotate: đây là api để detect image to text một cách đồng bộ
Response cũng tương tự như cách detect file.
II. Sử dụng Google Vision client
Với cách này, bạn phải instal thư viện Vision trước khi sử dụng.
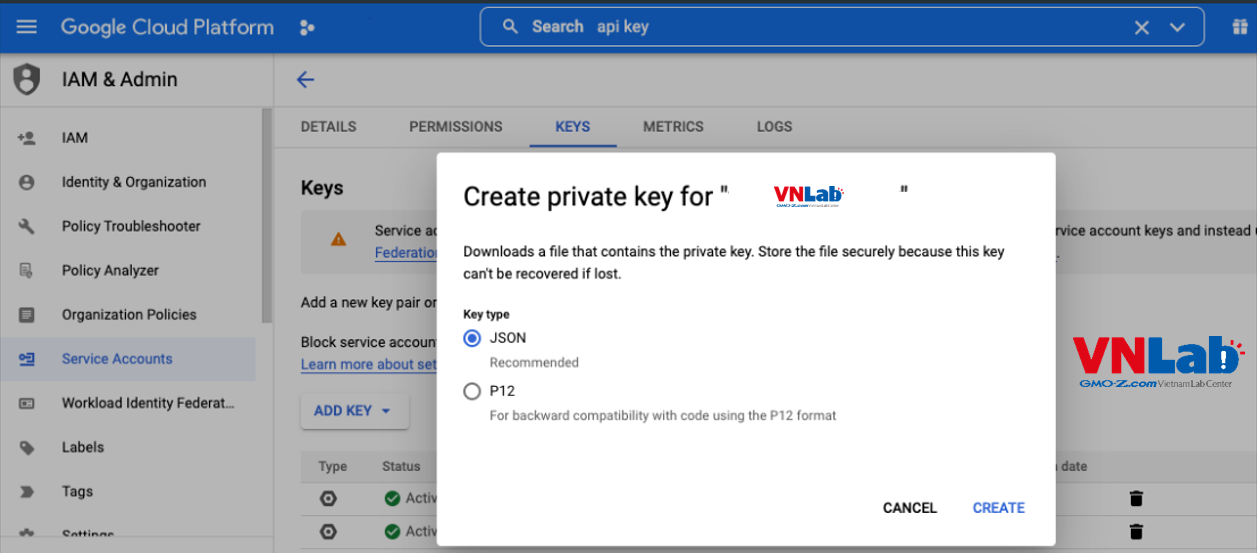
1. Chuẩn bị file key json
Cũng giống như việc chuẩn bị key nếu dùng API, bạn phải có tài khoản account google và login vào được google console. Tạo một project, và sau đó tạo một key dạng json. Sau khi tạo thành công, bạn sẽ có một file key dạng json.
Cấu trúc thư mục của mình sẽ có như sau:
my-demo
  |__config
  |    |__key.json
  |
  |__package.json
  |__server.js
  |__.env
File .env sẽ chứa đường dẫn đến key mà bạn đã create ở trên. GOOGLE_APPLICATION_CREDENTIALS là biến môi trường mặc định mà Google sử dụng. Bạn nên đặt đúng theo tên này, nếu dùng tên khác bạn sẽ cần thêm khai báo khi khởi tạo object google vision.
# GCV
GOOGLE_APPLICATION_CREDENTIALS=./config/key.json
2. Cài thư viện cần thiết
npm install @google-cloud/vision dotenv
① Code detect với file pdf
const dotenv = require('dotenv');
const Vision = require('@google-cloud/vision');
const fs = require("fs");

// Đọc biến môi trường
dotenv.config();

// Khởi tạo thư viện
const client = new Vision.ImageAnnotatorClient();

const filePath = './invoice.pdf';
const file = fs.readFileSync(filePath)
const inputConfig = {
    mimeType: 'application/pdf',
    content: file,
};
const features = [{type: 'DOCUMENT_TEXT_DETECTION'}];
const fileRequest = {
    inputConfig: inputConfig,
    features: features,
};
const request = {
    requests: [fileRequest],
};

// detect
const [result] = await client.batchAnnotateFiles(request);

console.log(result);
Các thuộc tính khai báo cũng không khác gì với lúc dùng api. Và response trả về cũng tương tự.
② Code detect với file image
const dotenv = require('dotenv');
const Vision = require('@google-cloud/vision');
const fs = require("fs");

// Đọc biến môi trường
dotenv.config();

// Khởi tạo thư viện
const client = new Vision.ImageAnnotatorClient();

const filePath = './invoice.pdf';

// detect
const ocrResult = await client.documentTextDetection(imgURL);

console.log(ocrResult);
Có thể thấy việc detect với hình ảnh còn đơn giản hơn file pdf. Chỉ cần hàm documentTextDetection và truyền vào đường dẫn file hình.
Tất nhiên response cũng sẽ tương tự. Nên mình sẽ ko note lại response ở đây. Bạn có thể xem ở phần detect với API.
III. Bonus: Sử dụng với thư viện trong PHP
Mình cũng đã thử demo với PHP, nên sẵn tiện mình cũng note lại code ở đây để các bạn tham khảo.
Dự án mình đang làm sử dụng Cakephp, nên mình sẽ viết kiểu framework này. Nhưng nhìn chung thì code PHP framework nào cũng giống nhau cả. Mình chạy trên PHP 7
- Cài đặt thư viện. Dùng composer để cài
composer require google/cloud google/cloud-vision phpseclib/phpseclib phpseclib/bcmath_compat
use Google\Cloud\Vision\V1\AnnotateFileRequest;
use Google\Cloud\Vision\V1\Feature;
use Google\Cloud\Vision\V1\Feature\Type;
use Google\Cloud\Vision\V1\ImageAnnotatorClient;
use Google\Cloud\Vision\V1\ImageContext;
use Google\Cloud\Vision\V1\InputConfig;

// khởi tạo thư viện
$imageAnnotator = new ImageAnnotatorClient([
    'credentials' => json_decode(file_get_contents('./key.json/'), true)
]);

// -------- detect file ảnh --------
$imgFile = file_get_contents('./invoice.png', true);
$ocrImgResult = $imageAnnotator->documentTextDetection($imgFile);

// -------- detect file pdf --------
$pdfFile = file_get_contents('./invoice.pdf', true);

$context = new ImageContext();
$context->setLanguageHints(['it']);

$input_config = (new InputConfig())
    ->setMimeType('application/pdf')
    ->setContent($pdfFile);

$feature = (new Feature())->setType(Type::DOCUMENT_TEXT_DETECTION);

$file_request = new AnnotateFileRequest();
$file_request = $file_request->setInputConfig($input_config)
    ->setFeatures([$feature])
    ->setPages([1]);

$requests = [$file_request];
$result = $imageAnnotator->batchAnnotateFiles($requests);
$ocrPdfResult = $result->getResponses();
$offset = $ocrPdfResult->offsetGet(0);
$responses = $offset->getResponses();
$res = $responses[0];
$annotations = $res->getFullTextAnnotation();

$imageAnnotator->close();
IV. Tổng kết
Thư viện Google Vision này bạn có thể kết hợp với các application như chụp ảnh rồi detect chữ, sau đó kết hợp với từ điển để dịch nghĩa từ. Khá là hay phải không! Chúc các bạn thực thi thành công.