Slack là một kênh liên lạc được khá nhiều công ty đang sử dụng hiện nay. Slack cung cấp nhiều tính năng, trong đó có hỗ trợ tạo button thao tác, giúp các developer có thể tự build cho mình những con Bot dễ dàng.
Bài viết này sẽ chia sẻ cách tạo con Bot có kèm button trong tin nhắn, khi click vào button, sẽ thực hiện một request đến webhook của server chúng ta, từ đó chúng ta có thể xử lý nghiệp vụ hệ thống mình một cách tự động.
Demo chúng ta sẽ làm như sau:
- Gửi 1 tin nhắn đến Slack có kèm button
- Click vào button
- Hệ thống sẽ bắt tín hiệu từ slack bằng webhook và update message đó với message mới mà không có button
- Hệ thống sẽ gửi trả lại thông điệp vào thread của message đó là đã xử lý xong
Bây giờ chúng ta bắt đầu thôi
1. Tạo 1 server bằng nodejs
Mình sẽ tạo một webhook bằng nodejs lắng nghe ở port 50300. Khi user click vào action button trên slack, thì slack sẽ gửi 1 request đến webhook này, từ đây developer có dữ liệu để xử lý tiếp các nghiệp vụ của hệ thống họ.
const express = require('express');
const cors = require('cors');
const bodyParser = require('body-parser');
const morgan = require('morgan');

const port = 50300;
const app = express();

app.use(cors());
app.use(bodyParser.json());
app.use(bodyParser.urlencoded({extended: true}));
app.use(morgan('dev'));

app.post('/mySlackWebhook', (req, res) => {
	res.send({
		status: true,
		message: 'POST: hello world',
		data: {}
	});
});

app.listen(port, () => {
	console.log(`Example app listening on port ${port}`)
});
Thử start server lên nào
% node debugPostSlackCloudFunctioBlog.js
Example app listening on port 50300
Gửi một request với phương thức POST đến webhook
% curl -m 70 -X POST http://localhost:50300/mySlackWebhook | jq
  % Total    % Received % Xferd  Average Speed   Time    Time     Time  Current
                                 Dload  Upload   Total   Spent    Left  Speed
100    55  100    55    0     0  18333      0 --:--:-- --:--:-- --:--:-- 18333
{
  "status": true,
  "message": "POST: hello world",
  "data": {}
}
Vì server đang ở local, nếu đăng ký webhook url là http://localhost:50300/mySlackWebhook cho Slack thì chắc chắn Slack sẽ không hiểu và bạn cũng không nhận được bất kì request nào đến server.
Vì vậy để Slack hiểu đc url ở local, chúng ta sẽ sử dụng 1 ứng dụng khá hay là ngrok. ngrok sẽ hỗ trợ biến đổi server localhost thành một server online mà có thể truy cập trên internet.
Download ngrok tại đây.
Bạn vẫn giữ nguyên trạng thái listening của server nodejs, sử dụng biến đổi localhost với port 50300 thành một url online bằng lệnh sau:
ngrok http 50300
Lúc này ngrok sẽ tạo cho bạn 2 url http và https
Region                        United States (us)
Web Interface                 http://127.0.0.1:4040
Forwarding                    http://c8d9-2402-800-63a9-8de8-cde-7a11-a130-db33.ngrok.io -> http://localhost:50300
Forwarding                    https://c8d9-2402-800-63a9-8de8-cde-7a11-a130-db33.ngrok.io -> http://localhost:50300
Bây giờ thử sử dụng link mà ngrok tạo và gửi 1 request đến webhook của mình
% curl -m 70 -X POST https://c8d9-2402-800-63a9-8de8-cde-7a11-a130-db33.ngrok.io/mySlackWebhook | jq
  % Total    % Received % Xferd  Average Speed   Time    Time     Time  Current
                                 Dload  Upload   Total   Spent    Left  Speed
100    55  100    55    0     0  18333      0 --:--:-- --:--:-- --:--:-- 18333
{
  "status": true,
  "message": "POST: hello world",
  "data": {}
}
OK, vậy là webhook chúng ta đã chạy ổn và có thể đăng ký webhook này với Slack.
2. Tạo Slack app
Bước này chắc chắn bạn đã có tài khoản slack rồi nhé.
Vào https://api.slack.com/apps để tạo một app.
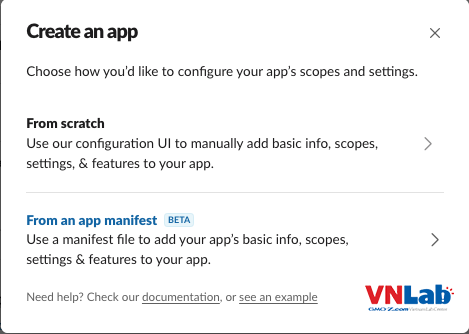
Chọn tạo app bằng From an app manifest. Nghĩa là mình sẽ định nghĩa app theo 1 scirpt (kịch bản) đã viết sẵn. Kịch bản như sau:
display_information:
  name: Outcoming APP
features:
  bot_user:
    display_name: Outcoming APP
    always_online: false
oauth_config:
  scopes:
    bot:
      - chat:write
settings:
  interactivity:
    is_enabled: true
    request_url: https://c8d9-2402-800-63a9-8de8-cde-7a11-a130-db33.ngrok.io/mySlackWebhook
  org_deploy_enabled: false
  socket_mode_enabled: false
  token_rotation_enabled: false
Copy kịch bản trên, sửa request_url phù hợp với webhook url của bạn và dán vào phần định nghĩa.
display_information.name: tên appoauth_config.scopes.bot: để app có quyền send message hay update message thì sẽ set cho quyềnchat:write. Để hiểu thêm về quyền tương ứng với api nào thì bạn đọc thêm tài liệu của slack nhé.settings.interactivity.is_enabled: chọntruenhé. Để kích hoạt chức năng tương tác.settings.interactivity.request_url: chính là webhook url của bạn
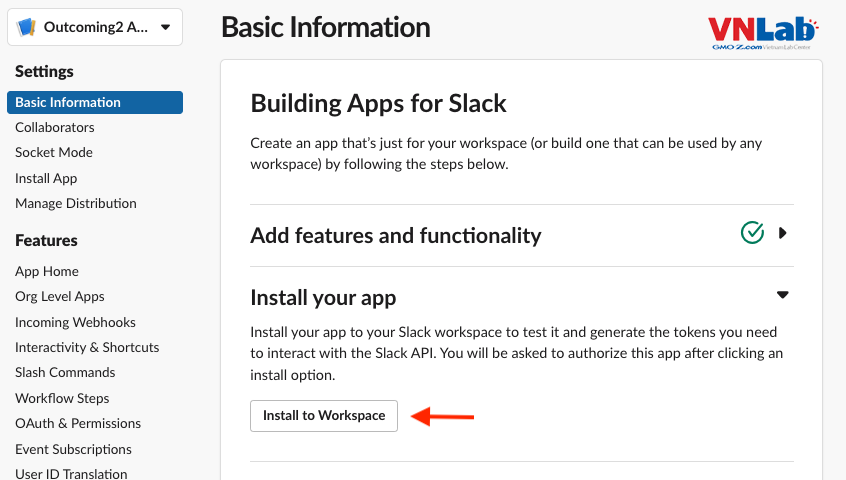
Sau khi tạo thành công app, bạn cần phải setting app với Workspace
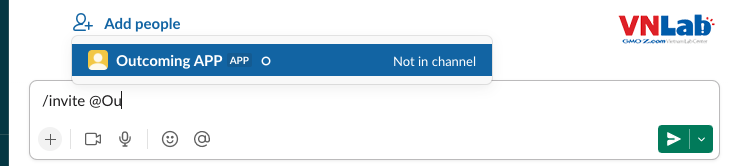
Về cơ bản tới bước này chúng ta đã có 1 app (hay gọi khác hơn là 1 con bot) kết nối với Workspace của bạn. Bây giờ muốn con bot đó hoạt động trong channel nào thì chúng ta add bot vào channel đó.
Tạo hoặc chọn một channel đã có, bạn invite bot đó vào như sau:
/invate @Bot Name
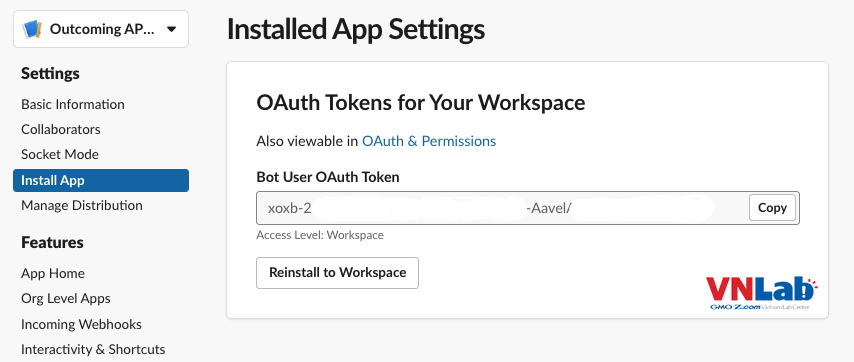
Ok, bot đã có mặt trong channel muốn gửi tin nhắn rồi. Bây giờ muốn gửi tin nhắn đến channel này, bạn cần phải có Key của bot. Lấy key ở đây và bỏ vào code nodejs của mình nhé.
3. Gửi 1 tin nhắn đến Slack bằng API
Bây giờ thử gửi 1 tin nhắn đến slack kèm theo button bằng curl thử nhé
curl -m 70 -X POST https://slack.com/api/chat.postMessage \
-H "Authorization: Bearer xoxb-25232XXXXXXXX-35935XXXXXXXX-iKXXXXXXXX" \
-H "Content-Type:application/json" \
-d '{
    "channel": "C03HCXXXXX",
    "text": "<!channel>",
    "attachments": [
        {
            "text": "Hello, Do you want approve this message?",
            "callback_id": "approve123",
            "color": "#3AA3E3",
            "attachment_type": "default",
            "actions": [
                {
                    "name": "outcomingID",
                    "text": "Approve",
                    "type": "button",
                    "style": "primary",
                    "value": "1234"
                }
            ]
        }
    ]
}'
Bạn sẽ thấy channel nhận được một tin nhắn từ bot của bạn
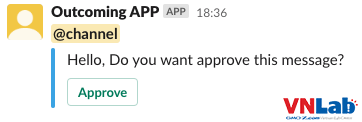
Cụ thể những params trên bạn có thể đọc trên tài liệu của Slack API.
Về cơ bản thì mình sử dụng attachments để định nghĩa đoạn tin nhắn, trong đó có kèm một action, action này mình định nghĩa nó là kiểu button, ngoài ra Slack còn hỗ trợ các kiểu khác như select. Nó giống như là tag input trong html vậy.
4. Update tin nhắn
Khi bạn click button Approve trên message của Slack, Slack sẽ gửi đến webhook của bạn 1 request (thông tin webhook bạn đã setup ở step 2 với thông số request_url: https://c8d9-2402-800-63a9-8de8-cde-7a11-a130-db33.ngrok.io/mySlackWebhook).
Dựa vào thông tin của request mà Slack gửi đến, hệ thống của chúng ta sẽ xử lý nghiệp vụ liên quan. Ở demo này mình sẽ update message cũ trên slack thành message mới.
4.1 Setup webhook
const express = require('express');
const cors = require('cors');
const bodyParser = require('body-parser');
const morgan = require('morgan');

const port = 50300;
const app = express();

app.use(cors());
app.use(bodyParser.json());
app.use(bodyParser.urlencoded({extended: true}));
app.use(morgan('dev'));

app.post('/mySlackWebhook', (req, res) => {
	const payload = req.body.payload ? JSON.parse(req.body.payload) : '';
	console.log(">>> payload: ", req.body.payload);
});

app.listen(port, () => {
	console.log(`Example app listening on port ${port}`)
})
Thông tin của Slack trả về cho webhook:
# ----- body
{
  "type": "interactive_message",
  "actions": [
    {
      "name": "outcomingID",
      "type": "button",
      "value": "1234"
    }
  ],
  "callback_id": "outcomingID=1234",
  "team": {
    "id": "T02FD6TBH3L",
    "domain": "vnlabcenter"
  },
  "channel": {
    "id": "C03HCJ5EVHT",
    "name": "privategroup"
  },
  "user": {
    "id": "U02FRJ9LWK1",
    "name": "landth"
  },
  "action_ts": "1654247385.489716",
  "message_ts": "1654246293.513859",
  "attachment_id": "1",
  "token": "XUXwdW9BdsknFkvOxbF6bvIq",
  "is_app_unfurl": false,
  "enterprise": null,
  "is_enterprise_install": false,
  "original_message": {
    "bot_id": "B03H8T3CURL",
    "type": "message",
    "text": "<@U02GJU46LQZ>\n<@U02FRJ9LWK1>",
    "user": "U03HFFE9YSX",
    "ts": "1654246293.513859",
    "app_id": "A03J592SQG0",
    "team": "T02FD6TBH3L",
    "bot_profile": {
      "id": "B03H8T3CURL",
      "deleted": false,
      "name": "Outcoming APP",
      "updated": 1653881869,
      "app_id": "A03J592SQG0",
      "icons": {
        "image_36": "https://a.slack-edge.com/80588/img/plugins/app/bot_36.png",
        "image_48": "https://a.slack-edge.com/80588/img/plugins/app/bot_48.png",
        "image_72": "https://a.slack-edge.com/80588/img/plugins/app/service_72.png"
      },
      "team_id": "T02FD6TBH3L"
    },
    "attachments": [
      {
        "id": 1,
        "color": "3AA3E3",
        "fallback": "出金データID=<https://example.com|1234>が作成されました",
        "text": "出金データID=<https://example.com|1234>が作成されました",
        "callback_id": "outcomingID=1234",
        "actions": [
          {
            "id": "1",
            "name": "outcomingID",
            "text": "振込依頼",
            "type": "button",
            "value": "1234",
            "style": "primary"
          }
        ]
      }
    ],
    "blocks": [
      {
        "type": "rich_text",
        "block_id": "vmM",
        "elements": [
          {
            "type": "rich_text_section",
            "elements": [
              {
                "type": "user",
                "user_id": "U02GJU46LQZ"
              },
              {
                "type": "text",
                "text": "\n"
              },
              {
                "type": "user",
                "user_id": "U02FRJ9LWK1"
              }
            ]
          }
        ]
      }
    ]
  },
  "response_url": "https://hooks.slack.com/actions/T02FD6TBH3L/3641284386368/9gSKqHo5GbRHvrqgAbi6Qn2E",
  "trigger_id": "3617453522275.2523231391122.0e95b0234d5ebfc73933fdbe299064a0"
}

# ----- header
{
  "host": "bf92-2402-800-63a9-8de8-50e6-95bf-798-df07.ngrok.io",
  "user-agent": "Slackbot 1.0 (+https://api.slack.com/robots)",
  "content-length": "2518",
  "accept": "application/json,*/*",
  "accept-encoding": "gzip,deflate",
  "content-type": "application/x-www-form-urlencoded",
  "x-forwarded-for": "35.175.209.114",
  "x-forwarded-proto": "https",
  "x-slack-request-timestamp": "1654238475",
  "x-slack-signature": "v0=b0cee9a65ba97dce7f95870248a691cdb1bcf0b40066b5ec434d528aa151f54f"
}
4.2 Update message
Từ thông tin mà webhook nhận được, bạn sẽ có được thông tin như:
payload.channel.id: ID của channelpayload.type: type messagepayload.response_url: url của slack message, bạn có thể thực hiện update message trên slack ngay lập tức với thông tin url này
const headers = {
    'content-type' : 'application/json',
    'Authorization': 'Bearer xoxb-25232XXXXXXXX-35935XXXXXXXX-iKXXXXXXXX'
};

const responseUrl = payload.response_url ? payload.response_url : '';
const attachments = payload.original_message.attachments;
attachments[0].text = "Your message is approved";
attachments[0].actions = undefined; // xóa button đi, mục đích không cho user click request approve lần nữa

// mình lấy lại thông tin blocks, attachements để giữ lại format hình dáng của message ban đầu. Bạn có thể định nghĩa 1 kiểu message khác tùy ý
const respData = {
    "blocks": payload.original_message.blocks,
    "attachments": attachments
};

request.post({
    headers,
    url: responseUrl,
    json: respData
}, function(error, response, body){
    console.log("response ok: ", body.ok);
});
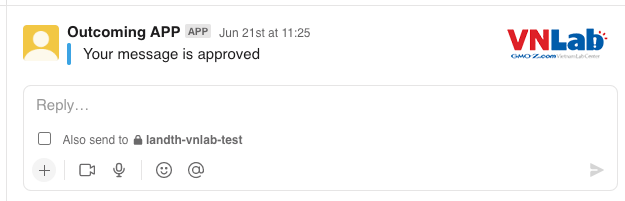
Ngoài cách dùng response_url, bạn cũng có thể update message thông qua API https://slack.com/api/chat.update
curl -m 70 -X POST https://slack.com/api/chat.update \
-H "Authorization: Bearer xoxb-XXXXXXXXX" \
-H "Content-Type:application/json" \
-d '{
	"channel": "ChannelID",
	"ts": "message_ts",
	"text": "Your message is updated"
}'
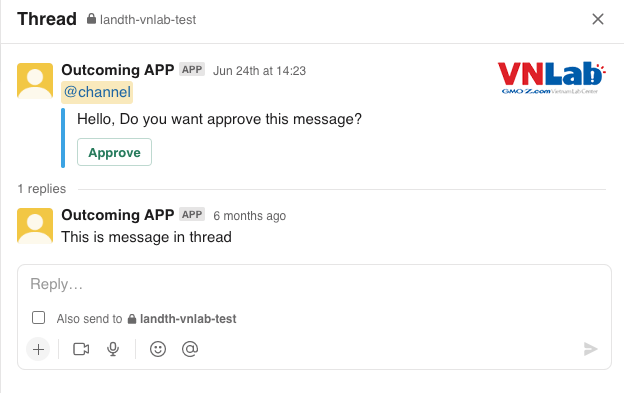
5. Gửi 1 tin nhắn vào thread
Trường hợp bạn không muốn replace message ban đầu, bạn có thể gửi 1 message mới vào thread của message ban đầu.
const channelID = payload.channel ? payload.channel.id : '';
const ts = payload.message_ts ? payload.message_ts : '';

const threadData = {
    "channel": channelID,
    "thread_ts": ts,
    "text": "This is message in thread"
};

request.post({
    headers,
    url: `https://slack.com/api/chat.postMessage`,
    json: threadData
}, function(error, response, body){
    console.log("sent to thread ok: ", body.ok);
});
6. Thêm verify request từ Slack
Để tăng tính security, bạn có thể thêm đoạn verify chữ kí từ Slack, để xác minh request đến webhook của bạn là từ Slack chính hiệu.
const signVerification = (req) => {
	const slack_signing_secret = 'a7a1223e9d481553c616bc433edf07b9';
	const request_body = qs.stringify(req.body,{ format:'RFC1738' });
	const timestamp = req.headers['x-slack-request-timestamp'];
	const sig_basestring = 'v0:' + timestamp + ':' + request_body;
	const sha256Hasher = crypto.createHmac("sha256", slack_signing_secret);
	const my_signing = 'v0=' + sha256Hasher.update(sig_basestring).digest("hex");
	const slack_signing = req.headers['x-slack-signature'];

	if (crypto.timingSafeEqual(
		Buffer.from(my_signing, 'utf8'),
		Buffer.from(slack_signing, 'utf8'))
	) {
		return true;
	}

	return false;
}

app.post('/mySlackWebhook', (req, res) => {
    if (!signVerification(req)) {
        return res.status(400).send('Verification failed');
    }

    // your code
});
7. Kết luận
Slack đã cung cấp khá nhiều api và các loại action hữu ích, từ đó bạn có thể build riêng cho mình 1 application tiện lợi.